
Collector & Appraiser Quick Reference: Solid Wood vs. Antique Veneer
- The #1 Definitive Test: The End-Grain Continuity Test. On solid wood, grain lines and annual growth rings wrap seamlessly over the edge into the end-grain. On veneered furniture, the end-grain is masked by edge banding or shows a distinct horizontal seam line.
- The Core Antique Myth: “Veneer = Cheap Modern Fake.” False! In 18th- and 19th-century cabinetmaking, veneering was an elite luxury art form used by master craftsmen to display exotic, highly figured timbers (crotch mahogany, burr walnut, bird’s-eye maple) that were structurally impossible to use as solid planks without severe seasonal splitting.
- Veneer Thickness Chronology: Pre-1830 hand-sawn veneers are extraordinarily thick (1/16″ to 1/8″ / 1.5mm–3mm). Post-1880 machine-sliced veneers measure ~1/28″ (0.9mm), while modern commercial rotary veneers are paper-thin (1/40″ to 1/50″ / 0.5mm).
- Underside Wood Clues: Check the raw timber underneath. Solid tables feature identical timber top and bottom (e.g. solid oak or solid rock maple). Veneered tables reveal secondary “blind” woods beneath (e.g. unfinished white pine, yellow poplar, or chestnut).
- Value Impact: High-style antique veneered masterworks (Chippendale, Hepplewhite, Federal) routinely command $2,000 – $15,000+, often vastly outvaluing plain country solid wood tables. However, on 20th-century factory furniture, solid hardwood suites (Tell City) command higher resale than mass-produced veneered tables (Mersman).
Every weekend at estate sales, auctions, and antique malls, buyers and collectors ask the exact same question while kneeling beside an old dining table: “Is this solid wood, or is it just veneer?”
Unfortunately, modern retail furniture has conditioned 21st-century consumers to treat the word “veneer” as an insult. In today’s big-box furniture stores, veneer usually means a microscopic 1/50-inch sliver of wood glued over toxic formaldehyde particle board or MDF. If you spill a glass of water on it, the edges swell, bubble, and disintegrate within hours.
Yet in the world of authentic antique furniture, this assumption is completely backwards. Throughout the 17th, 18th, and 19th centuries, veneering was the highest echelon of the cabinetmaker’s craft. Master artisans utilized hand-sawn sheets of rare Caribbean crotch mahogany, Circassian burr walnut, and satinwood over stable old-growth timber cores to create museum-grade masterpieces that have survived for over 250 years.
Whether you are evaluating an 18th-century Chippendale tea table, a 19th-century American Empire sideboard, or a mid-century colonial dining set, knowing how to distinguish solid hardwood from veneer—and dating the thickness of that veneer—is essential for accurate authentication and valuation.
1. The 5 Definitive Physical Tests: Solid Wood vs. Veneer
You do not need destructive testing or laboratory tools to determine whether an antique table is solid wood or veneered. Professional conservators rely on five tactile, optical, and mechanical diagnostics:
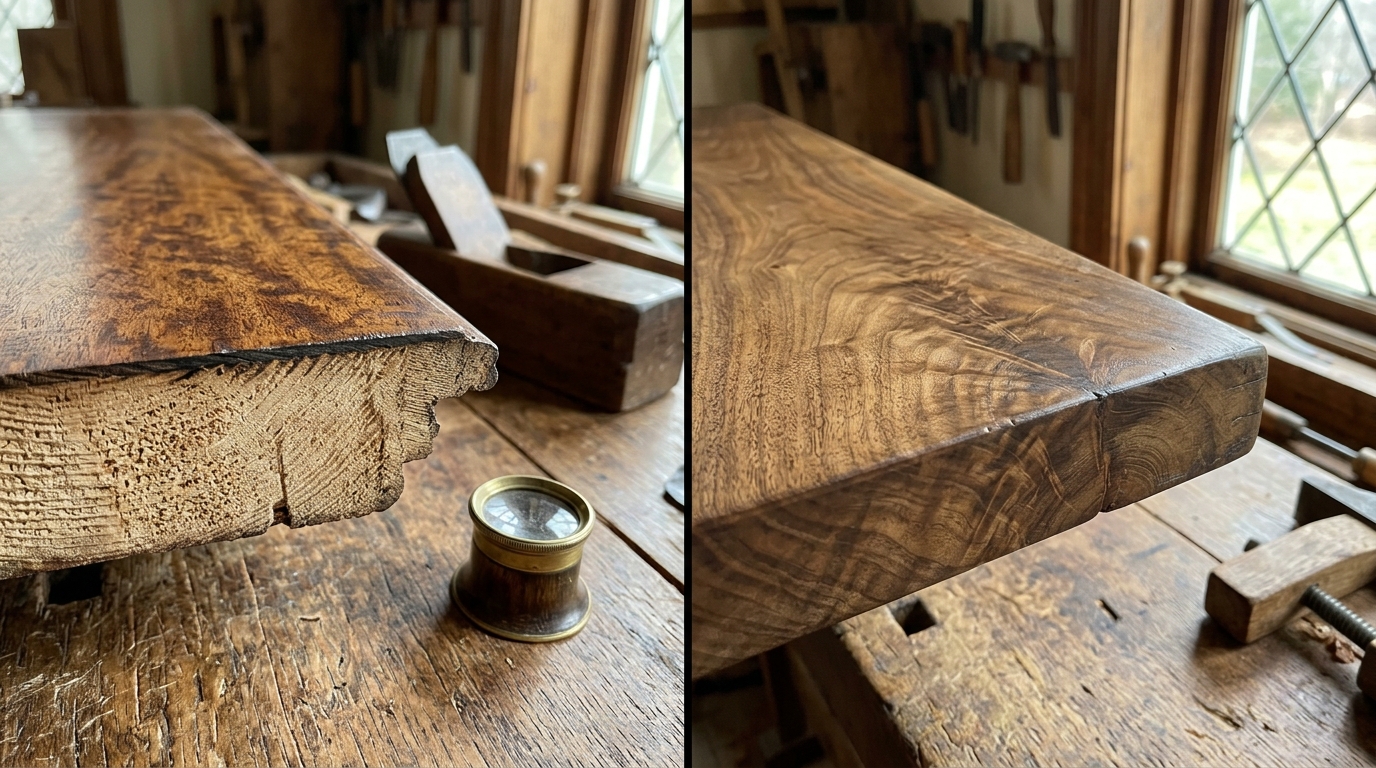
The two worlds of antique joinery: A thick hand-sawn crotch mahogany veneer cross-section over antique pine (left) contrasted with a solid hardwood plank showing continuous end-grain flow (right).
Test 1: The End-Grain Continuity Test (The “Wrap” Test)
This is the golden standard of furniture forensics. Timber trees grow with longitudinal vascular fibers. When a board is cut from a log, the short ends of the board reveal the cut ends of those fibers: the end-grain.
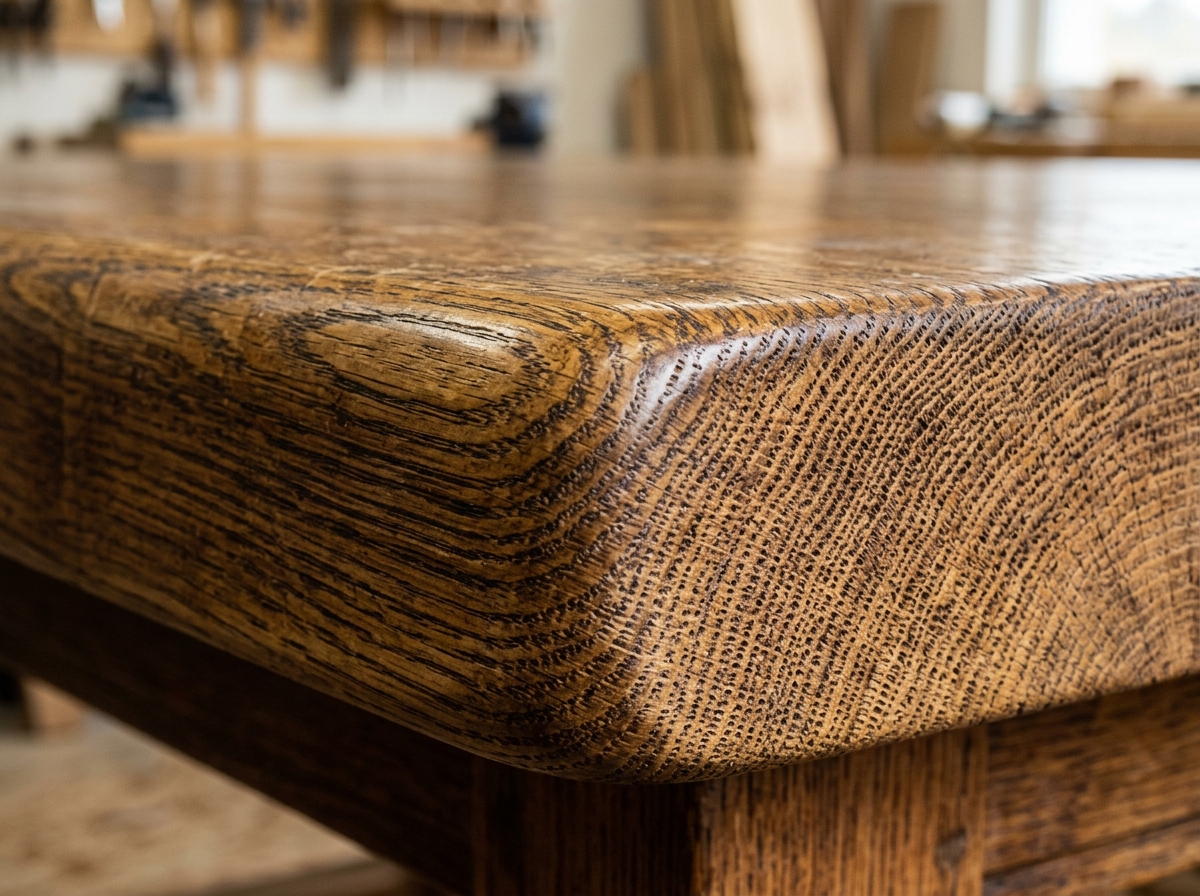
The smoking gun of solid wood: Follow the dark growth rings and ray cells on the polished top face. Notice how they wrap uninterrupted over the corner and continue directly down the end-grain face.
- On a Solid Wood Table: Select a prominent dark growth ring or ray fleck near the edge of the tabletop. Trace that line with your fingernail over the rounded edge. On a solid wood table, that exact same growth ring will wrap smoothly over the lip and continue down the end-grain face. There is no disruption, no seam line, and no change in wood structure.
- On a Veneered Table: The top surface grain will run in one direction, but when you look at the edge, you will either see a thin horizontal strip of veneer applied across the edge (edge banding) with grain running horizontally, or you will spot a distinct horizontal glue seam where the top decorative sheet terminates on top of the underlying core wood.
Test 2: Underside Secondary Timber Inspection
Get down on your hands and knees with a flashlight and inspect the raw, unfinished underside of the tabletop:
- Solid Hardwood: The wood on the underside is the exact same species as the top. If the top is antique quarter-sawn white oak (as explored in our Guide to Antique Oak Identification), the underside will show coarse oak grain, medullary rays, and matching saw kerfs. Knots, grain sweeps, or board glue seams visible on top will correspond directly with features beneath.
- Veneered Table: The underside will reveal a completely different, less expensive “secondary” or “blind” wood. For example, an 18th-century dining table with a flame mahogany top will feature raw white pine, tulip poplar, or chestnut underneath. On 20th-century production pieces like vintage Mersman tables, you will see yellow poplar or sweetgum substructures beneath paper-thin mahogany face veneers.
Test 3: Damage Pattern Forensics (Chipping vs. Dents)
No antique survives centuries without scars. How a table damages tells you exactly how it was constructed:
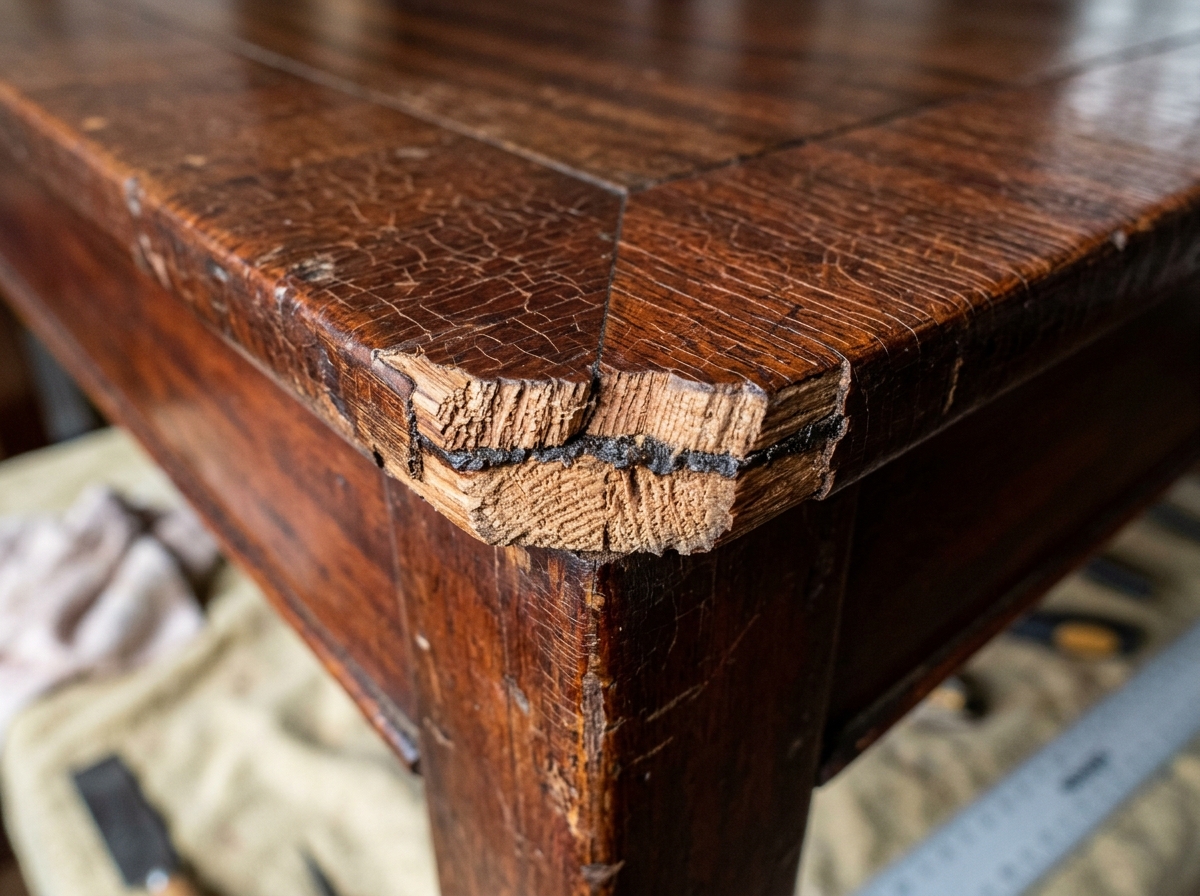
Damage forensics: An authentic 19th-century veneer chip revealing the substantial 1/16-inch thickness of hand-sawn timber bonded with dark animal hide glue over a pine substrate.
- How Veneer Fails: Veneer fails in flat flakes, lifted edges, and blisters. When moisture degrades historic animal hide glue, the veneer delaminates from the core, forming hollow raised bubbles (“blisters”). If struck, veneer chips off in thin, flat shards, exposing a lighter, raw wood substrate underneath. If your veneered tabletop suffers from cloudy moisture hazing, read our protocol on Removing White Heat Rings from Antique Tables.
- How Solid Wood Fails: Solid hardwood never blisters or chips off in flat sheets. Heavy impacts create rounded dents, compression bruises, or gouges that reveal the same wood color and fiber structure all the way down. Extreme seasonal stress causes solid planks to crack along the natural grain line with full-thickness structural checks.
Test 4: Mirror-Image Bookmatching (The Symmetry Rule)
Look across the top of the table from several feet away. Does the wood grain display mesmerizing, symmetrical “Rorschach ink-blot” patterns, where the flame or burl grain on the left side perfectly mirrors the grain on the right side?
- If yes, it is 100% veneered. It is biologically impossible for a single solid tree trunk to produce identical mirror-image grain patterns across a solid tabletop. Cabinetmakers achieved bookmatching by slicing consecutive sequential sheets of veneer from the same flitch and laying them open side-by-side like the pages of a book.
- Solid tabletops consist of individual 6- to 12-inch hardwood boards glued edge-to-edge. While master joiners matched color and grain direction, the grain patterns across solid boards remain organically asymmetrical.
Test 5: Edge Profile & Carving Depth
Inspect the decorative carvings on table aprons, rims, and legs:
- Solid Carving: Intricate three-dimensional relief carvings—such as the scalloped pie-crust rims detailed in our Antique Tilt-Top Table Guide or the ball-and-claw feet of Duncan Phyfe tables—must be carved out of solid hardwood. You cannot wrap veneer around deeply undercut 3D acanthus leaves or ball-and-claw talons.
- Flat & Curved Surfaces: Tabletops, drawer fronts, and flat friezes are the primary domains of veneering. On high-end antique tables, cabinetmakers commonly paired solid carved legs and frames with spectacular veneered tabletops.
2. Antique Veneer Thickness Chronology: Sawn vs. Rotary
One of the most powerful dating tools available to an antique appraiser is measuring the thickness of the veneer sheet itself. The technology used to cut veneers evolved dramatically between 1700 and 1950:
| Era & Period | Manufacturing Method | Average Veneer Thickness | Adhesive Type | Visual & Tactile Hallmarks |
|---|---|---|---|---|
| 17th Century – 1820 | Hand-Sawn (Pit-Saw / Frame Saw) | 1/8″ to 1/16″ (2.0mm – 3.2mm) | Hot Animal Hide Glue | Substantial thickness; slight hand-saw kerf irregularities; thick dark glue line; hand-scraper tool ripples. |
| 1820 – 1875 | Circular Saw Cut (Steam Mill) | 1/16″ to 1/20″ (1.2mm – 1.6mm) | Animal Hide Glue | Uniform thickness; smooth machine backing; robust enough to withstand light hand-planing and sanding. |
| 1875 – 1925 | Mechanical Knife Slicing | 1/28″ to 1/32″ (0.8mm – 0.9mm) | Hide Glue & Casein Glue | Knife chatter lines on unpolished reverse; thinner cross-section; prominent in Victorian and Eastlake tables with Knapp joint drawers. |
| 1930 – Modern | Rotary Lathe Peeling | 1/40″ to 1/50″ (≤ 0.5mm) | Synthetic Urea-Formaldehyde Resin | Paper-thin cross-section; flat artificial appearance; will sand through instantly; bonded over plywood or particle board cores. |
The 18th-Century “Sawn Veneer” Difference: An 18th-century Chippendale or Federal table with hand-sawn crotch mahogany veneer has timber sheets up to six times thicker than modern factory veneer! You can lightly scrape, wax, and buff historic sawn veneer without any danger of wearing through to the core.
3. Why Master Cabinetmakers Chose Veneer Over Solid Wood
To evaluate antique tables with a professional eye, one must discard modern biases and understand why historic cabinetmakers specifically selected veneer for their most expensive commissions:
- Structural Stability (Taming Wood Movement): Wood naturally expands and contracts across its grain as humidity fluctuates. Highly figured timbers—such as crotch mahogany (cut from the fork where a tree trunk divides) or root burls—possess chaotic, swirling grain orientation. If a cabinetmaker tried to build a 48-inch tabletop out of solid crotch mahogany, the conflicting internal grain tensions would cause the board to warp, twist, and violently crack down the middle within its first winter. By cutting the figured timber into a 1/8-inch veneer and gluing it to a straight-grained, quartered white pine substrate, the wood was stabilized forever.
- Artistic Bookmatching & Marquetry: The symmetrical “flame” and “feather” figures of Georgian and Federal dining tables, sideboards, and Pembroke tables were only possible through slicing matching sheets of veneer. Solid wood can never achieve bilateral symmetry.
- Conservation of Precious Exotics: Imported Caribbean mahogany (*Swietenia mahagoni*), French walnut, and Brazilian rosewood were astronomically expensive luxuries shipped across treacherous oceans. Veneering allowed artisans to maximize these exotic treasures across grand dining suites rather than hiding valuable timber inside unseen structural cores.
To dive deeper into authentic wood identification, explore our diagnostic guide on How to Tell Cherry from Mahogany in Antique Furniture.
4. Valuation Impact: Is Solid Wood Always Worth More?
The answer depends entirely on the historical era and style of the table:
| Furniture Era / Category | Solid Wood Appraisal Value | Veneered Appraisal Value | Which Commands Higher Value? |
|---|---|---|---|
| 18th-Century Georgian & Federal (1760–1810) | $1,200 – $3,500 (Plain Mahogany / Walnut) | $3,500 – $15,000+ (Figured Crotch / Satinwood) | Veneered (Higher artistry, rarer figure) |
| 19th-Century American Empire (1820–1840) | $600 – $1,200 | $1,000 – $2,800 (Flame Crotch Mahogany) | Veneered (Classic high-style Empire aesthetic) |
| Early American Country / Farmhouse (1750–1880) | $800 – $2,500 (Solid Pine, Cherry, Maple) | $300 – $600 (Rare in country pieces) | Solid Wood (Honest utilitarian rustic charm) |
| Mid-20th-Century Vintage (1930–1970) | $400 – $1,200 (Tell City Solid Maple) | $100 – $350 (Mersman Poplar/Veneer) | Solid Wood (Durability against chipping/sagging) |
When Does Veneer Destroy Value?
- Severe Delamination or Missing Veneer: Replacing lost veneer requires matching antique grain and applying period-correct hide glue. Extensive missing veneer patches decrease a table’s value by 40% to 60%.
- “Sanded-Through” Disasters: Amateurs attempting to refinish antique veneered tables with modern electric orbital sanders frequently burn through the thin veneer into the secondary wood core, creating an unsightly pale spot that cannot be reversed. A sanded-through tabletop suffers an immediate 70% to 80% loss in market value.
5. Conservation & Care: Protecting Antique Veneered Surfaces
Because authentic antique veneer is bonded with natural animal hide glue, it responds beautifully to traditional conservation techniques:
- Re-Adhering Lifted Veneer Blisters (The Warm Iron Technique): Historic hide glue is reversible. If an antique table has a raised veneer bubble, place a clean damp cotton rag over the blister. Apply a warm (not scorching) clothes iron over the cloth for 15 to 20 seconds. The heat and steam re-liquefy the dried hide glue beneath. Immediately clamp the blister flat with a wooden block and wax paper for 24 hours. The glue will re-bond naturally without introducing foreign chemicals.
- Never Use Belt Sanders or Chemical Dips: Always preserve the original thickness of antique sawn veneer. Chemical dipping tanks dissolve animal hide glue and cause the entire veneer sheet to lift and buckle.
- Nourish with High-Grade Paste Wax: Avoid aerosol silicone polishes that penetrate under veneer edges. Apply a microcrystalline or beeswax-carnauba paste wax buffed along the grain. Consult our master guide on the Best Wax for Antique Mahogany Dining Tables for optimal preservation steps.
Frequently Asked Questions (FAQ)
Is antique veneer made of real wood?
Yes, absolutely. Antique veneer is 100% genuine hardwood. In fact, 18th- and 19th-century veneers were hand-sawn from the finest old-growth trees available on earth, such as genuine Cuban mahogany, European walnut, and rosewood. It is completely different from modern plastic laminate (Formica) or photo-printed paper veneers used on modern flat-pack particle board.
How can you tell if wood is solid or veneer without damaging it?
Perform the End-Grain Continuity Test. Inspect the edge of the board where the grain cuts off. On solid wood, the growth rings visible on top will wrap continuously over the corner into the end-grain. On a veneered table, the end-grain is concealed by edge banding, or you will spot a distinct horizontal seam line separating the top veneer layer from the core wood.
Why did antique furniture makers use veneer if solid wood was available?
Master cabinetmakers used veneer for structural stability and artistic beauty. Highly figured timbers (such as crotch mahogany, burls, and fiddleback maple) have erratic internal grain tensions. If used as solid planks, they expand unevenly and violently split across the tabletop. Veneering stabilized these rare, exotic timbers over quarter-sawn native pine or poplar cores while enabling symmetrical mirror-image bookmatching.
Can you sand and refinish an antique veneered table?
Yes, but with extreme caution. Hand-sawn 18th-century veneers are relatively thick (1/16″ to 1/8″) and can tolerate gentle hand sanding with fine sandpaper (220-grit). However, 20th-century factory veneers are paper-thin and will sand through almost instantly. Never use heavy rotary or belt sanders on any veneered antique furniture.
Save this antique identification guide to your Pinterest board:
Pingback: How to Tell Cherry from Mahogany in Antique Furniture: The Collector’s Wood Guide - Antique Tables
Pingback: Mersman Table Markings, Model Numbers & Value: Complete Collector’s Guide - Antique Tables