
When professional antique appraisers and decorative arts conservators evaluate a table, chest, or desk, they do not start by admiring the polished exterior tabletop or the carved cabriole legs. Instead, their first physical action is almost universally the same: they pull out a drawer, flip it upside down, and examine its raw, unvarnished anatomy.
The exterior of an antique table can be easily faked, refinished, or assembled from salvaged old wood. However, the interior drawer box represents the cabinetmaker’s private workshop signature. Hidden from public view, the drawer box was built quickly with utilitarian hand tools, revealing unmistakable chronological benchmarks: hand-planed feather chamfers, marking gauge scribe lines, grain shrinkage orientation, and secondary wood selection that together date a piece within a precise ten-to-fifteen-year window.
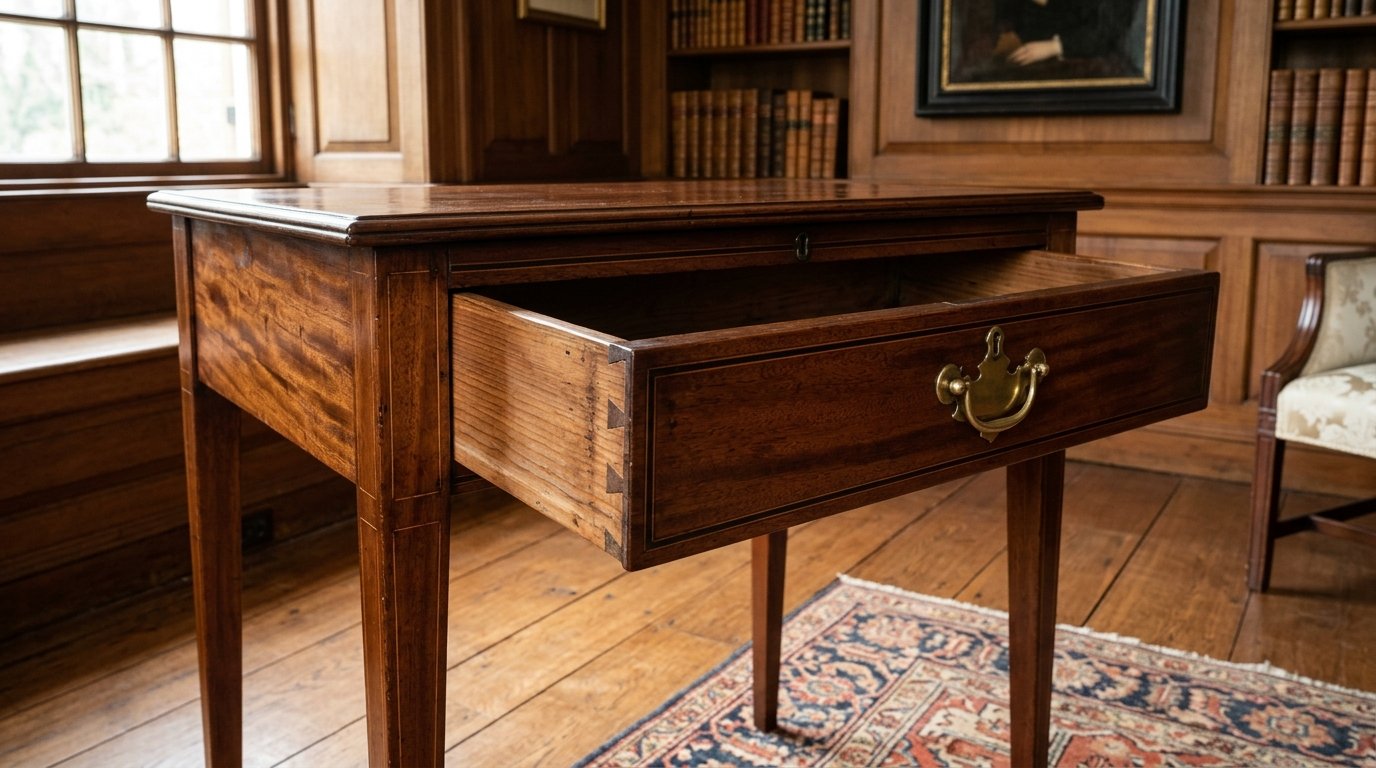
Quick Reference: Antique Furniture Drawer Construction Timeline (1650–1950)
In the decorative arts, drawer construction evolved through distinct technological phases as hand tools gave way to water-powered mills and steam-powered assembly lines:
| Historical Era | Date Range | Drawer Bottom Attachment & Grain Direction | Runner & Joinery Characteristics |
|---|---|---|---|
| Jacobean & Early William & Mary | 1650–1700 | Nailed directly to rebates on drawer sides with hand-wrought rosehead nails; heavy hand-hewn boards; grain runs front-to-back. | Side-hung drawers: Deep horizontal groove plowed into exterior drawer side; rides on wooden runners nailed to carcase walls; coarse rebate joints or large single dovetails. |
| Early Queen Anne & Georgian | 1700–1740 | Drawer bottom slides into hand-plowed groove (dado) in sides; flat square bottom edges; nailed to bottom of back board; grain runs front-to-back. | Bottom-riding drawers: Rides on bottom edges of sides; early hand-cut through dovetails; thick secondary white pine or oak sides (1/2″ to 5/8″ thick). |
| Chippendale & High Georgian | 1740–1785 | Chamfered (feather-edged) bottom: Thick solid board planed thin at perimeter to slide into delicate groove; grain strictly runs front-to-back. | Refined half-blind hand dovetails with narrow pins; visible cabinetmaker marking gauge scribe lines; drawer bottom slides freely under short drawer back. |
| Federal & Neoclassical (Hepplewhite/Sheraton) | 1785–1820 | Chamfered bottoms transition to thin flat bottoms supported by glued interior wooden “slips” or glue blocks; grain still predominantly front-to-back. | Extremely fine, needle-narrow hand-cut dovetail pins; prominent marking gauge score marks; tulip poplar and white pine secondary framing. |
| Empire & Early Victorian | 1820–1870 | Grain direction shifts side-to-side: Bottoms slide into standard machine-sawn grooves; circular saw kerfs appear on undersides; thicker bottom boards. | Heavier, coarser hand dovetails; machine circular-sawn secondary woods; introduction of pointed gimlet screws (post-1846) securing drawer hardware. |
| Late Victorian & Eastlake (Knapp Era) | 1870–1900 | Mechanized thin grooved bottoms (1/4″ thickness); factory machine-planed boards; stamped model numbers or factory stencil markings. | Knapp joint (pin-and-cove): First mechanized drawer joint (scallop and dowel); uniform machine-sawn dovetails; slotted metal drawer stops. |
| 20th-Century Commercial & Revival | 1900–1950+ | Thin 3-ply plywood bottoms (post-1910); stapled or machine-nailed into grooves; synthetic adhesives; zero shrinkage gaps. | Mathematically identical machine-cut dovetails with rounded cutter bit radii; rotary planer scallop ripples; galvanized wire brads. |
1. Drawer Bottom Attachment Evolution: Nailed, Grooved, Chamfered & Slips
Drawer bottom attachment evolved through four distinct structural stages: 1) Nailed directly to the bottom rebate (pre-1700); 2) Slid into plowed side grooves with square edges (1700–1740); 3) Hand-planed with chamfered feather edges (1740–1810); and 4) Supported by glued interior wooden slips (post-1800).
Phase 1: The Nailed Bottom (Pre-1700)
In seventeenth-century American Pilgrim Century and English Jacobean joinery, drawer engineering was rudimentary. Cabinetmakers simply rabbeted (stepped) the lower edge of the heavy drawer sides and nailed the bottom board directly into the wood from underneath using hand-forged wrought iron nails with rosehead or T-head profiles. Over centuries, downward weight frequently caused these nailed bottoms to pull loose or split along the nail line.
Phase 2: The Plowed Groove (c. 1700–1740)
During the William & Mary and early Queen Anne periods, joiners recognized that trapping the bottom board inside a grooved channel eliminated the structural failure of nails. Using a specialized plow plane, craftsmen cut a continuous 1/4-inch groove along the interior lower edge of the drawer front and sides. The drawer bottom—a thick, flat-sawn board—slid into this track from the rear.
Phase 3: The Hand-Planed Chamfered (Feather-Edged) Bottom (c. 1740–1810)
The hallmark of eighteenth-century Chippendale and Federal mastery is the chamfered or beveled drawer bottom. To maintain high load-bearing strength across large dining table drawers, desks, and lowboys, cabinetmakers used a substantial 3/8-inch to 1/2-inch thick solid wood board. However, cutting a 1/2-inch groove into the drawer sides would weaken the side walls.
The elegant engineering solution was to bevel (chamfer) all four edges on the underside of the bottom plank using a hand bench plane. This created a delicate 3/16-inch “feather edge” that slid snugly into a slender groove, while the central mass of the board retained full structural thickness.
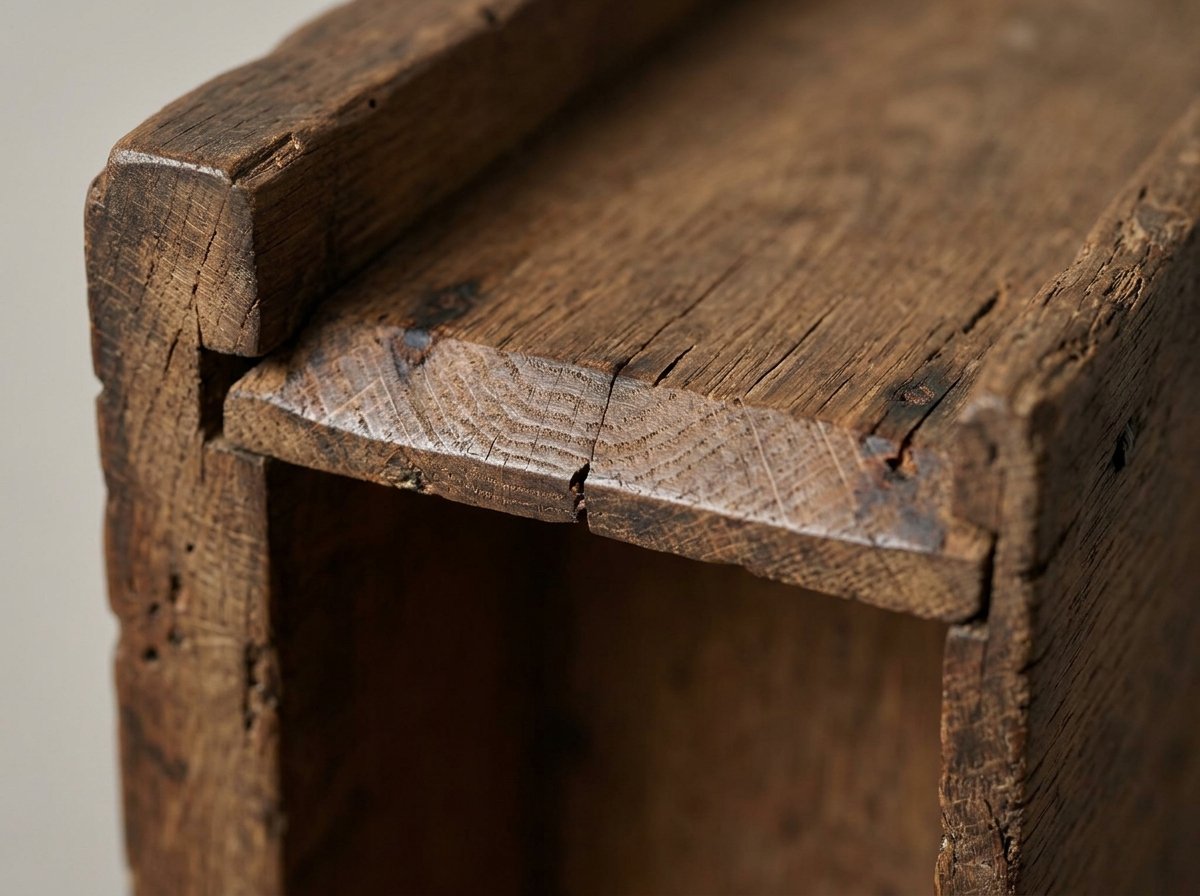
Phase 4: Drawer Slips (c. 1800–1880)
By the turn of the nineteenth century, cabinetmakers seeking to save labor began utilizing drawer slips—narrow strips of wood with a pre-plowed groove glued along the interior lower junction of the drawer sides. This eliminated the need to plow grooves directly into the drawer sides themselves, allowing thinner, lighter drawer side stock.
2. Grain Orientation Forensics: Front-to-Back (Pre-1800) vs. Side-to-Side (Post-1800)
The orientation of wood grain in a drawer bottom is one of the most reliable chronological indicators in antique appraisal: In pre-1800 furniture, grain strictly runs front-to-back to accommodate cross-grain wood shrinkage; after 1800–1820, mechanized sawmills popularized side-to-side grain orientation.
Why did eighteenth-century cabinetmakers insist on running the drawer bottom grain from front to back? The answer lies in wood cellular anatomy and seasonal hygroscopic movement:
- Transverse Shrinkage Mechanics: Hardwoods and softwoods expand and contract dramatically across their grain width (radially and tangentially), but shrink virtually zero percent along their grain length.
- Preventing Front Joint Blowouts: If the grain ran side-to-side, the drawer bottom would expand forward in summer humidity, exerting tremendous hydraulic pressure against the delicate drawer front dovetails and blowing the joint apart. In winter heating, it would shrink backward and pull completely out of the front groove.
- The Elegant Engineering Solution: By orienting the grain front-to-back, the bottom board expanded and contracted harmlessly into the side grooves. The back of the drawer was cut intentionally short (leaving a 1/2-inch gap underneath), allowing the bottom board to slide under the back. The bottom was fastened only at the very center of the back board with a single wrought nail or cut screw, leaving the board free to float laterally with the seasons.
The 1800–1820 Transition: As commercial steam-powered circular sawmills emerged, lumber was mass-produced in wide, standardized planks. Factory shops abandoned labor-intensive hand-chamfered front-to-back bottoms and began installing thin boards with the grain running side-to-side, often held with multiple factory nails. If you find a table drawer where the bottom grain runs side-to-side, it almost certainly dates to after 1810–1820.
3. Cabinetmaker Layout Scribe Lines: The Scribing Gauge “Smoking Gun”
Cabinetmaker scribe lines are deep, incised knife or pin marks etched across the wood to establish dovetail depth before hand-sawing. In authentic pre-1860 hand-made furniture, these scribe lines consistently overrun or extend past the base of the dovetail pins and tails.
Before cutting dovetails by hand, an 18th- or early 19th-century joiner used a brass-bound wooden marking gauge fitted with a sharp steel pin. The joiner adjusted the gauge to the exact thickness of the mating board, placed the fence against the end-grain edge, and firmly dragged the tool across the face of the board. This etched a permanent, razor-sharp baseline to which the joiner would saw the dovetail pins and tails.
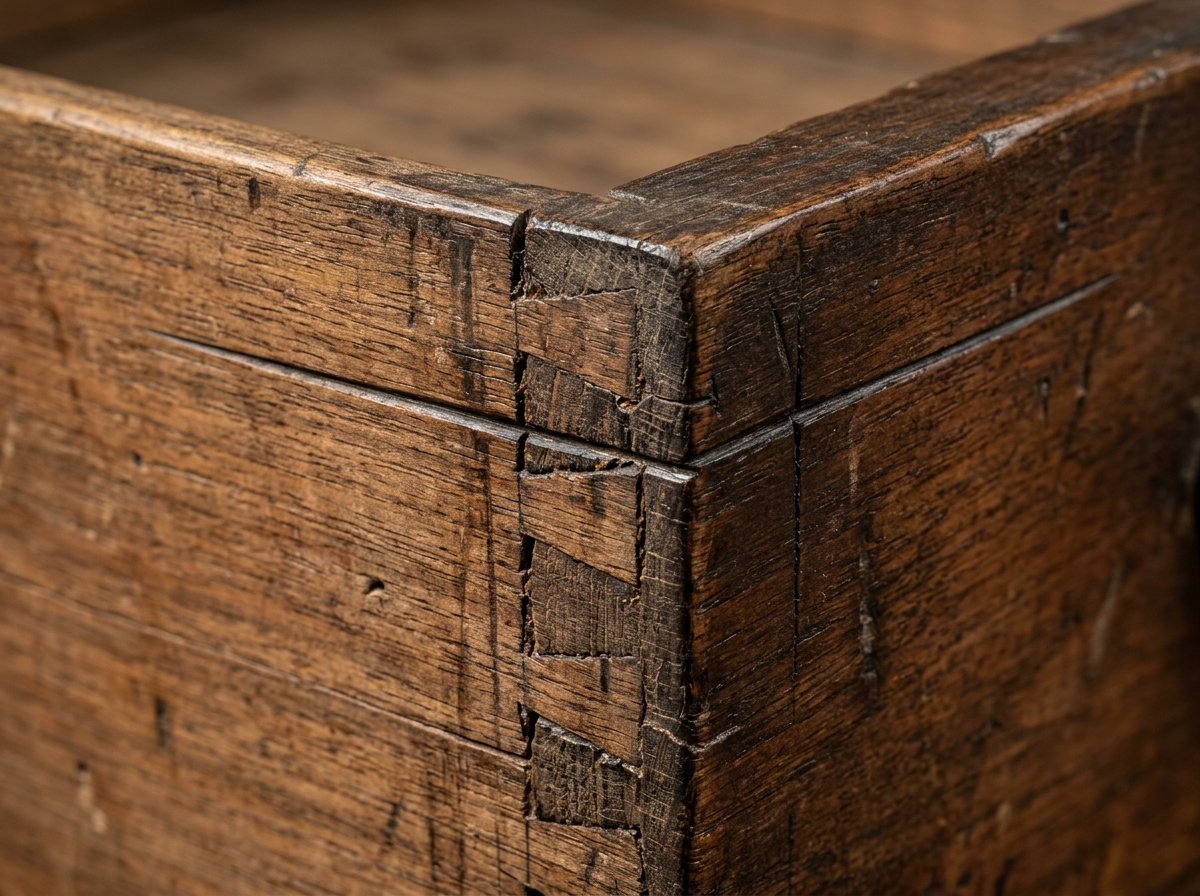
Because marking gauges were dragged in a continuous stroke across the entire width of the drawer side, the score line consistently overruns the dovetail joints by 1/4 inch to several inches. Over centuries of oxidation and wood cleaning, these incised lines fill with dark aged wax and patina, creating a permanent indelible forensic signature. Machine-cut dovetails (post-1870) and modern CNC router bits cut directly from mathematical templates and will never display a layout scribe mark.
4. Drawer Runner Systems: Side-Hung Grooves vs. Bottom-Riding Rails
Drawer suspension systems indicate furniture age: 17th-century drawers were side-hung, sliding along heavy wooden cleats mortised into deep exterior grooves; 18th- and 19th-century drawers transitioned to bottom-runners sliding over horizontal dust boards.
- Side-Hung Drawers (c. 1650–1700): Look at the exterior sides of the drawer box. In seventeenth-century Pilgrim Century, Jacobean, and early William & Mary tables (such as early taproom and antique tavern tables), a deep horizontal groove is plowed straight down the center of each exterior drawer side. This groove rode on a matching hardwood rail (cleat) nailed to the inner carcase wall. When pulled out, the drawer hangs suspended by its sides.
- Bottom-Riding Drawers (c. 1700–1880): By the Queen Anne era, joiners moved the suspension to the bottom edge. The lower edges of the drawer sides slide directly upon wooden runner strips nailed or mortised into the carcase divider rails. Over two centuries of friction, authentic antique bottom-runners develop deep, polished wear grooves on the underside edges of the drawer sides.
- Full Dust Boards & Web Framing (c. 1750–1830): High-style Chippendale, Federal, and Hepplewhite multi-drawer tables and chests incorporated full thin pine or tulip poplar horizontal partitions (dust boards) between drawers. This prevented dust from falling between tiers and prohibited thieves from prying into locked lower drawers from above.
- Side Metal Glides & Roller Wheels (Modern Era – Post-1940): Any presence of stamped steel tracks, nylon roller wheels, or ball-bearing telescoping glides proves mid-to-late twentieth-century manufacture.
5. Secondary Wood Diagnostics: Regional Clues Hidden in Drawer Boxes
Secondary woods are unexposed timbers used for drawer sides, backs, and bottoms. Because cabinetmakers sourced secondary wood from local regional forests, analyzing drawer timber definitively establishes geographic origin: Eastern white pine indicates New England; tulip poplar indicates the Mid-Atlantic; yellow pine indicates the American South.
While an exquisite antique Pembroke table or card table might feature imported Cuban mahogany or Santo Domingo rosewood on its exterior, the drawer box reveals where the piece was actually built:
| Secondary Wood Species | Visual & Tactile Characteristics | Geographic Origin & School Attribution |
|---|---|---|
| Eastern White Pine (Pinus strobus) | Creamy pale white aging to rich pumpkin-amber; fine straight grain; lightweight; soft sweet aroma when sanded. | New England & Northern Colonies: Massachusetts (Boston/Salem), Rhode Island (Newport/Goddard-Townsend), New Hampshire, Connecticut. |
| Yellow Poplar / Tulipwood (Liriodendron tulipifera) | Fine, smooth diffuse-porous grain; distinctive greenish or olive-brown cast; lightens to khaki-tan with age; resists warping. | Mid-Atlantic: Pennsylvania (Philadelphia Chippendale), New York (Duncan Phyfe workshops), New Jersey, Maryland, Delaware. |
| Southern Yellow Pine (Longleaf / Shortleaf) | Distinct, prominent alternating light and dark annual growth rings; heavy, resinous density; strong turpentine pine scent. | The American South: Virginia, North Carolina, South Carolina (Charleston cabinetmaking workshops), Georgia. |
| American Chestnut (Castanea dentata) | Coarse ring-porous grain resembling red oak but without medullary rays; lightweight; resistant to rot; golden-tan hue. | Appalachian & Mid-Atlantic Rural Workshops: Pennsylvania, Virginia, Ohio Valley farmstead tables. |
| English Oak & Scots Pine (Deal) | Dense, heavy English brown oak or coarse Scots pine (often called “deal” in period inventories); tight annual growth rings. | England & Scotland: Georgian, Queen Anne, and Victorian British cabinet imports. |
6. Cabinetmaker Numbering, Roman Numerals & Chisel Chalk Marks
Historical cabinetmakers fitted each drawer individually by hand to its specific opening. To ensure the correct drawer returned to its matching opening during final finishing, joiners gouged Roman numerals or chalk inscriptions onto drawer backs and carcase dividers.
Because every hand-planed drawer opening had microscopic variances of 1/32 to 1/16 of an inch, drawers were not interchangeable. Pull the drawer completely out and inspect the exterior of the back board, the underside of the bottom, and the interior carcase drawer runners. Authentic 18th- and early 19th-century joiners left distinctive layout markings:
- Chiseled Roman Numerals: Joiners used a small wood chisel or race knife to strike Roman numerals (I, II, III, IIII, V, VI) into the top edge of the drawer back and the corresponding drawer divider rail. (Notice the traditional use of IIII rather than IV).
- Cabinetmaker Chalk Marks: Blue, red, or white chalk inscriptions noting customer names, cabinetmaker initials, or assembly sequence numbers. Authentically aged chalk shows faint ghosting that has settled deep into the porous wood grain.
- Paper Merchant Labels & Stencils: In late Federal and Victorian factory production (1830–1900), paper labels pasted to the inside or bottom of drawers became common. For maker mark authentication, review our guide on how to date antique furniture by drawer pulls and hardware.
7. Four Red Flags: Detecting Replaced Bottoms, Marriages & Fake Antiques
Detecting drawer alterations requires four checks: 1) Inspecting plywood edge banding; 2) Spotting rotary planer milling ripples; 3) Checking for modern round wire brads; and 4) Verifying wood oxidation contrast between drawer sides and bottoms.
- Plywood or Hardboard Replacement: Examine the rear edge of the drawer bottom where it slides under the back board. If you see layered alternating veneer laminations (plywood) or pressed fiberboard (Masonite), the bottom has been replaced in the 20th century. Authentic 18th-century bottoms are always solid, single-thickness lumber planks.
- Rotary Planer “Chatter” Marks: Run your fingers along the raw underside of the drawer bottom. Authentic 18th-century boards exhibit subtle, irregular washboard scallops left by a curved hand scrub plane. If you feel perfectly uniform, parallel machine ripples (spaced exactly 1/16″ or 1/8″ apart), the timber was processed by a mechanized commercial rotary planer (post-1860).
- Modern Wire Brads vs. Cut Nails: Inspect how the bottom board is tacked to the drawer back. Genuine pre-1800 drawers feature hand-forged wrought nails or blunt hand-filed screws; pieces from 1790–1890 use square-headed rectangular cut nails. If you find modern round-headed wire brads or shiny drywall screws, the drawer has been repaired or rebuilt. Learn more in our guide to dating antique furniture by screws.
- Oxidation Hue Mismatch: Over 150 to 250 years, raw secondary pine or poplar oxidizes into a rich, dusty golden-amber or tobacco hue. If the drawer sides are dark amber but the drawer bottom is bright, clean, pale yellow, the bottom board has been replaced.
Frequently Asked Questions: Dating Antique Furniture by Drawers
How does the grain direction of a drawer bottom indicate age?
In authentic pre-1800 American and European antique furniture, the wood grain of the drawer bottom runs front-to-back (perpendicular to the drawer face). This allowed the solid wood board to expand and contract across its width without buckling or pulling out of the front groove. After 1800–1820, industrial mechanization standardized wide lumber boards, causing commercial factories to orient drawer bottom grain side-to-side (parallel to the drawer face).
What are cabinetmaker scribe lines on an antique drawer?
Cabinetmaker scribe lines are razor-sharp incised knife or marking gauge layout lines etched directly into the wood to establish the depth of dovetail pins and tails before sawing. In authentic hand-made pre-1860 drawers, these scribe lines consistently overrun or extend past the base of the dovetails on both the drawer sides and front edges. Modern factory machine dovetails never display layout scribe marks.
What is a chamfered or beveled drawer bottom?
A chamfered (feather-edged) drawer bottom is a thick solid wood plank whose perimeter edges have been beveled down with a hand plane so that a 3/8″ to 1/2″ thick structural board could slide snugly into a delicate 3/16″ plowed groove cut into the drawer sides. This technique was the hallmark of fine 18th-century Georgian, Queen Anne, Chippendale, and Federal cabinetmaking.
How were 17th-century drawers attached compared to 18th-century drawers?
In 17th-century Jacobean and early William & Mary furniture (pre-1700), drawer bottoms were nailed directly to the bottom rebate edges of the drawer sides with hand-forged wrought nails, and the drawers were side-hung—sliding on wooden runners fitted into deep horizontal channels plowed into the exterior drawer sides. By 1710, cabinetmakers transitioned to grooved drawer sides where the bottom rested inside plowed channels and rode on bottom runners.
What are secondary woods and why are they found in antique drawers?
Secondary woods are cheaper, locally sourced structural timbers used for unexposed furniture elements—principally drawer sides, backs, and bottoms. While the exterior of a table or desk used expensive primary woods like Cuban mahogany or walnut, cabinetmakers utilized Eastern white pine in New England, yellow pine in the American South, tulip poplar in the Mid-Atlantic, and oak or Scots pine in England.
How can you tell if an antique drawer bottom has been replaced?
A replaced drawer bottom typically displays rotary planer milling marks (continuous parallel ripples), multi-ply plywood veneer edges, modern wire brads or shiny round-head screws, or modern polyurethane coatings rather than raw, hand-planed oxidation with natural cross-grain shrinkage gaps at the drawer back.
Pingback: How to Date Antique Furniture by Dovetails: Hand-Cut vs. Machine Guide
Pingback: The Complete Guide to Antique Table Styles: Eras, Identification & Values - Antique Tables